Perform the migration
Logstash
Introduction
Logstash is a data processing engine that executes data ingestion pipelines, performing collection, transformation/filtering and sending of the data to one or more destinations.
Part of the ELK stacks (the L stands for Logstash), Logstash can ingest data to or from Elasticsearch, but also other sources such as files, Kafka, databases and many others by default, and is easily extensible by the use of plugins, like our logstash-output-amazon_es open source plugin.
Logstash is resilient and provides persistent queues and dead letter queues in case of an error.
It can run as a daemon (background service) for jobs using a scheduler, or with a one-time call for simple batch jobs.
Warning: non-scheduled jobs running through the background service will run, finish and restart indefinitely, which might not be what you want.
You can find more information in our documentation and also Logstash’s official documentation.
Operations
Return to the cdk deploy output and click the link labeled AesMigrationLabStack.BastionUrl. This brings you to another AWS Cloud9 environment but inside your application VPC and with access to the different instances.
Locate the .pem file that contains the private key from the EC2 KeyPair you created at the beginning of this lab. Drag and drop that file into the top portion of the Cloud9 environment window to import it. Choose Save from the File menu.
Set the permissions (change the name for this command if you named your file something different):
chmod 400 migration.pem
Locate the AesMigrationLabStack.migrationLogstashInstanceXXXXXXXX in the cdk deploy output and use the below command to SSH to the Logstash EC2 instance. Be sure to replace the '<url>' in the command with the value from the output. When prompted, type 'yes' to connect.
ssh -i migration.pem logstash.example.com
You are now connected to the Logstash instance. The Logstash EC2 instance has an IAM role attached for authentication with the Amazon Elasticsearch Service domain. You mapped that IAM role to the role you created in Amazon ES.
Let’s download the template for the movies index:
aws s3 cp s3://ee-assets-prod-us-east-1/modules/4355131df236401f84582927415385b5/v1/template.json .
Now send the template to the Amazon Elasticsearch Service domain. Copy the value of AesMigrationLabStack.AmazonEsEndpoint from the cdk deploy output and replace '<Amazon ES endpoint>' with that value. Replace '<region>' in the below command with the region in which you deployed the lab.
cat template.json | aws-es-curl --region <region> -X PUT <Amazon ES endpoint>/_template/movies
The result should be: {"acknowledged":true}
You can look at the Logstash configuration for validation:
cat /etc/logstash/conf.d/es-aes.conf
The configuration looks like:
input {
    elasticsearch {
        hosts => [ "http://internal-odfe-data-123456789.eu-west-1.elb.amazonaws.com:9200" ]
        user => "admin"
        password => "admin"
        index => "movies"
        size => 1000
        scroll => "1m"
        docinfo => true
    }
}

output {
    amazon_es {
        hosts => [ "https://vpc-aesmigr-aesdom-xxxxxxxxxxxxx-xxxxxxxxxxxxxxxxxxxxxxxxxx.eu-west-1.es.amazonaws.com" ]
        region => "us-east-1"
        codec => "json"
        index => "%{[@metadata][_index]}"
        document_id => "%{[@metadata][_id]}"
    }
}
Here is some explanation of the content:
We first have our source or collector that will read from classic Elasticsearch using basic_auth credentials. In our case, we configured it for the
moviesindex only, processing chunks of 1000 documents, scrolling over a search context for 1 minute.Enabling the docinfo makes it possible to use the index metadata such as
_idand_indexin other steps.In this case, there is no filtering or processing because we just want to copy the data around.
The output uses our logstash-output-amazon_es open source plugin to write to the Amazon ES domain using IAM authentication.
We need to specify the region here for the Signature V4 signing process, and reuse _index and _id from the original document.
Double check that the region is properly set, and we are good to go.
Notice that there are no credentials for the amazon_es output as they are available through the instance profile.
This configuration uses an Elasticsearch source with basic auth, and an Amazon Elasticsearch Service output with IAM authentication. It will copy only the movies index.
You can find more information about the Amazon Elasticsearch Service output for Logstash here.
Check the indices available in the target domain:
aws-es-curl --region <region> <Amazon ES endpoint>/_cat/indices?v
Launch Logstash to perform the copy:
sudo -u logstash /usr/share/logstash/bin/logstash -f /etc/logstash/conf.d/es-aes.conf
Now the movies index should be available in the target cluster:
aws-es-curl --region <region> <Amazon ES endpoint>/_cat/indices?v
If needed, we can add a schedule parameter to the elasticsearch input to periodically update the target index when new documents are being indexed during the migration.
Update the lambda function (API backend)
Go to AWS Lambda in the AWS console and click on the AesMigrationLabStack-ApiLambdaXXXXXXXX-XXXXXXXXXXXX lambda.
Code
In the Code tab, double-click the function.py file.
You need to update the authentication method to go from basic auth that was used with the self-managed cluster, to IAM authentication using Signature Version 4.
The code is already prepared, we just need to change the auth value. Scroll down to line 24. You should see
r = requests.post(url, auth=basic_auth, headers=headers, data=query)
Changle the line, replacing basic_auth with awsauth
r = requests.post(url, auth=awsauth, headers=headers, data=query)
At the top of the editor, click Deploy.

Environment
Locate AesMigrationLabStack.AmazonEsEndpoint in the cdk deploy output. Copy the value.
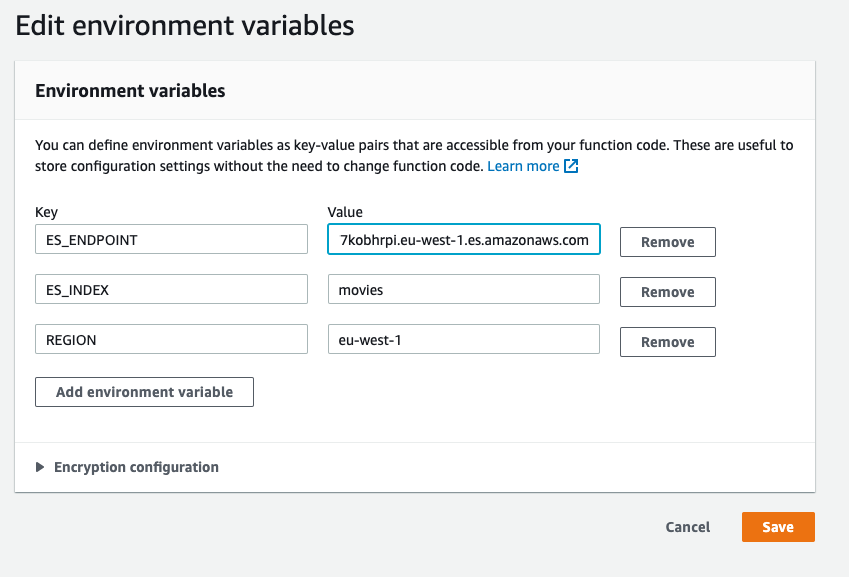
In the Lambda console, at the top of the IDE, click the Configuration tab. Locate and click Environment variables in the left menu. Click Edit. Update the ES_ENDPOINT environment variable with the value from AesMigrationLabStack.AmazonEsEndpoint

Save the changes.
Congratulations!
You just finished the migration of your self-managed cluster to Amazon Elasticsearch Service for your application.
You can go back to the application URL (AesMigrationLabStack.CloudFrontEndpoint) and see that is still running.